
Have you ever made a quilt and had it quilted at a shop. It is so expensive.
Did you know that instead, you can quilt it yourself? On the sewing machine you already have?
Wahoo!! (Get prepared for an arm workout...literally.)
So...you have finished the top of your quilt. Now what?
Well, first I would suggest trying to stipple a smaller project just for practice before doing your quilt. That way you will be much more comfortable when you stipple your pride and joy.
Also, I have to say that this method uses lots of safety pins. I have heard that some people use quilting spray adhesive which works well too. For me, safety pins are cheaper...so I use them.
Here's what you do:
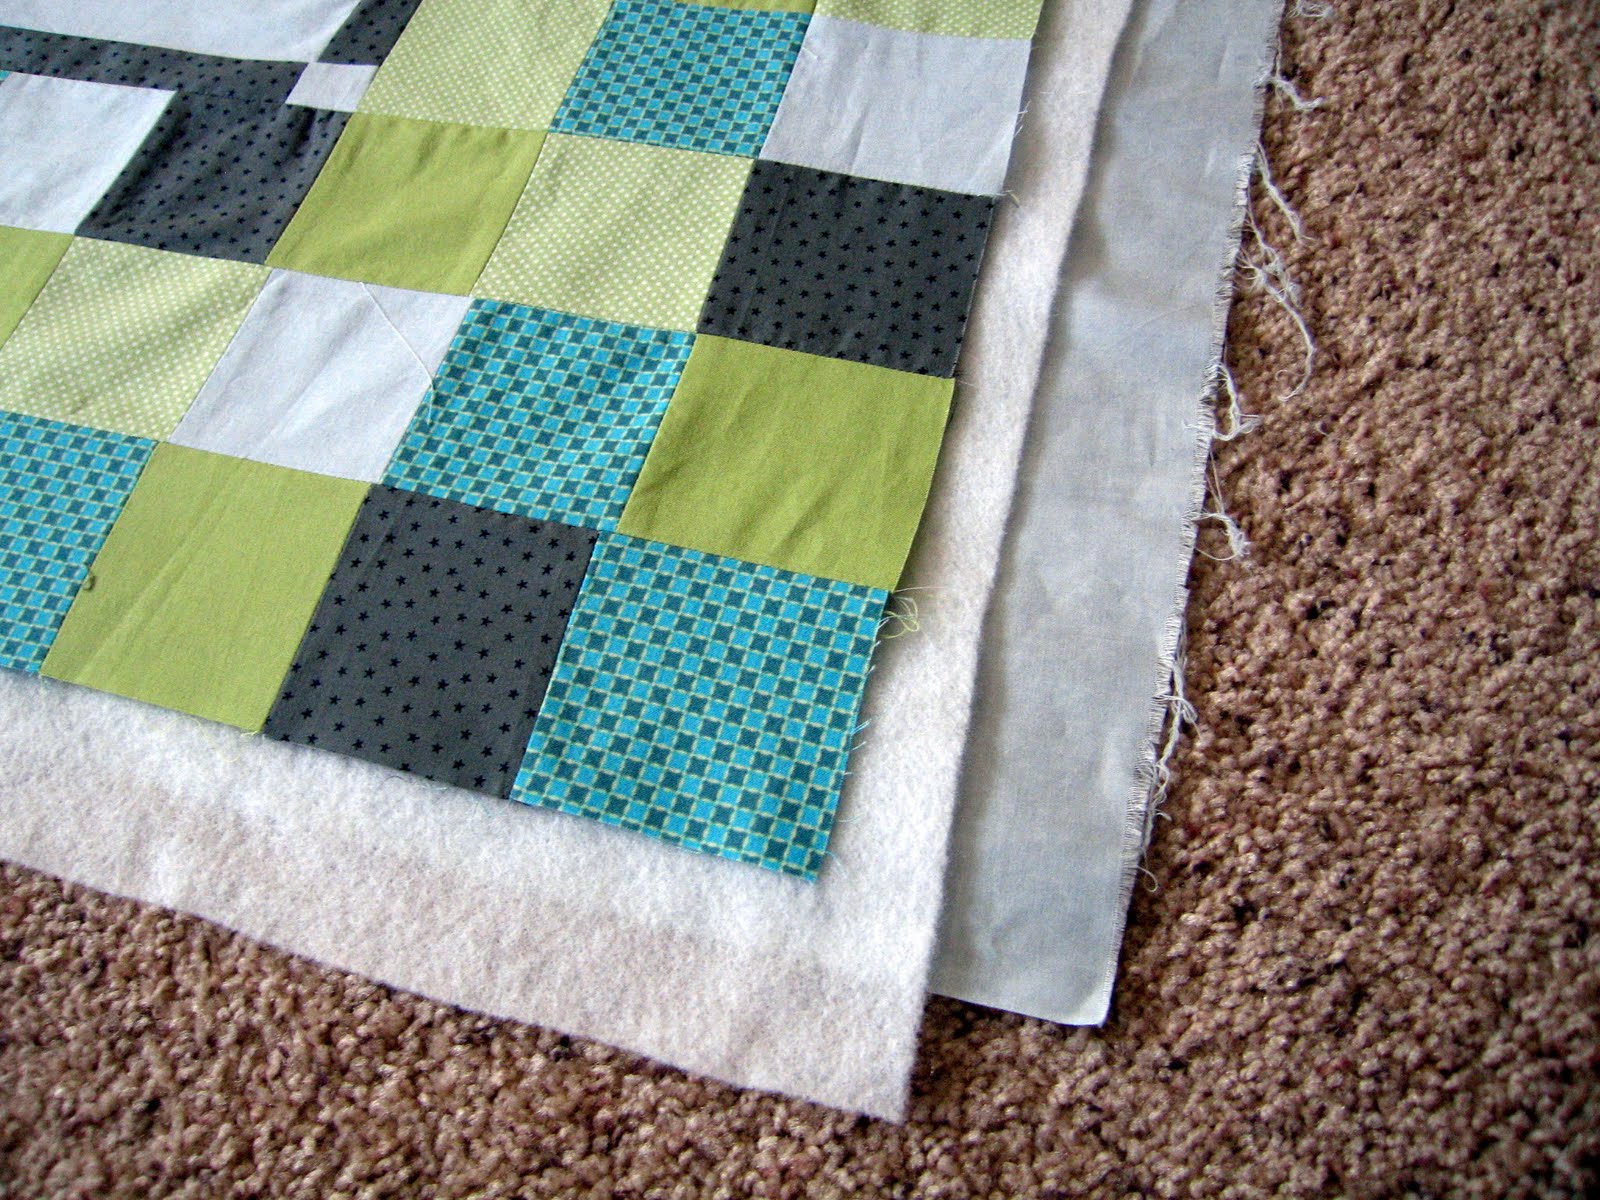
First, find a large open space and lay the backing of your quilt flat. You want the wrong side up. (Which means the right side--or the one you want to see when its finished--would be facing the floor.)

Next, lay your batting on top of the backing. Flatten it out as best as you can.

Next, lay the top of your quilt on the batting with the right/pretty side facing up. As you can see, we are building the quilt the way we will want it to look when we are done.

Double check that your backing and batting are sticking out farther than the top of your quilt. If not, try again. This is really important!
Once you have adjusted your layers and everything is laying as flat a possible, grab a whole bunch of safety pins. You will want to pin about every 4-6 inches depending on what you are comfortable. When pinning, make sure you catch all three layers (and not the carpet). Smooth and straighten the layers as much as you need to get everything as flat as possible. Start in the middle...

...and work your way out, tugging softly on each layer to make sure it is flat.

And keep pinning....and pinning.....and pinning until your blanket looks something like this:

This is a good time to double check that the bottom layer and the batting are bigger than (and reaching over the edge) of the top.
When you flip it over, I guarantee that the bottom will not look as straight and flat as the top. That's okay. Just do your very best to make sure the layers are as flat as possible.

In order to stipple with free hand quilting, you need a free hand quilting foot. Mine looks like this:

You also need to drop the feed dogs (the little teeth-like bar underneath your sewing foot that grabs the fabric and pulls it through while you sew).

You may have to look in your sewing machine manual to figure out how to drop the feed dogs. On my machine, I just push a button. Some machines don't have a way to drop the feed dogs, but they have a metal plate that you attach so that the feed dogs aren't touching the fabric. Either way, when they are dropped, they will look something like this:

If you have a little sewing table that attaches to your machine and gives you more surface area to work on, you will definitely want to use it. It really helps,
You want to take your quilt and roll it up until you get to the center. You will start quilting in the center and work outwards. You never want to have more than 1/2 of the quilt rolled up (it gets a little squishy as you can imagine). Put the rolled portion in your machine like this:

Now, drop your sewing foot like this:

At the beginning of the stitch, instead of back stitching, just stitch a few stitches in the same place before moving your fabric. This will secure it. Start making loopy patterns around your quilt. You will want to double check that the fabric underneath is laying nice and flat. Don't stitch over any safety pins, just stipple your way around them.
The trick to stippling is to try and keep the speed of the stitch the same, and the speed of your hands moving the quilt around the same so that the stitch length on the quilt is fairly constant (this is really hard....so don't get discouraged if you have some long stitch lengths and some that are short).

When you need to readjust the fabric (which is pretty often), drop your needle into the fabric so it holds while you are moving things around. Again, make sure that bottom layer is nice and flat.

As you go, you will have two hands (one of mine had to take the picture) on the side of the quilting foot moving the fabric around as you go. This is where the arm workout comes in. Seriously.

And as you go, this is what your quilt will start to look like.

If you ever come across a long piece of thread coming out of the machine without catching, it means that your bobbin is empty. Put more thread on it, and start again. Just start a little bit (1/4 inch) before the thread stopped and stitch a few stitches in one place to secure it. And keep on stippling....

When you are finished, you should have stippled every last part of your quilt. Good job! (I hope your arms aren't killing you).

Go through and trim up all the loose threads.

Then remove all the safety pins.

And don't be surprised if you find a few places where the bottom wasn't laying quite flat. Once you wash and use the blanket, they aren't as noticeable. Trust me!

It looks pretty crazy from the back!

You will want to trim off the extra backing and batting to create a nice flush edge with the top of your quilt.

And you did it!

Now all you have to do is add the binding. (Tutorial on that to come soon.)
Happy Stippling!
(If you have questions, please email me or leave them in the comments and I will be sure to answer them as soon as I can.)
oh goodness! Katie this will come in so handy. Thank you for taking the time to make this tutorial.
ReplyDeleteKatie. This makes me SO excited!! I will be calling you for sure when I get to this point but this helped so much!
ReplyDeleteWOW--when did you have time to learn all this? During high school (with seminary, school, sports, SAT prep, AP classes etc...) O my gosh!! amazing!
ReplyDeleteLooks pretty good. 1 thing, if you use masking tape when you lay out your backing, pull it taut but don't stretch it. You will have a much better chance at getting the back smooth.
ReplyDeleteThank you so much for the tip Deanna!
ReplyDeleteAnkara
ReplyDeleteBolu
Sakarya
Mersin
Malatya
A2HZ
Diyarbakır
ReplyDeleteSamsun
Antep
Kırşehir
Konya
1KRB
bitlis
ReplyDeleteurfa
mardin
tokat
çorum
KFİ4N
bartın evden eve nakliyat
ReplyDeletebitlis evden eve nakliyat
diyarbakır evden eve nakliyat
kars evden eve nakliyat
nevşehir evden eve nakliyat
OWOHDD
malatya evden eve nakliyat
ReplyDeleteartvin evden eve nakliyat
kocaeli evden eve nakliyat
ankara evden eve nakliyat
düzce evden eve nakliyat
8KBD7
aydın evden eve nakliyat
ReplyDeletebursa evden eve nakliyat
trabzon evden eve nakliyat
bilecik evden eve nakliyat
antep evden eve nakliyat
HXVURW
724A8
ReplyDeleteEdirne Evden Eve Nakliyat
Kars Evden Eve Nakliyat
Afyon Parça Eşya Taşıma
Adıyaman Parça Eşya Taşıma
Sakarya Lojistik
28E7D
ReplyDeleteMaraş Şehir İçi Nakliyat
Batman Lojistik
Erzurum Lojistik
Muş Parça Eşya Taşıma
Keçiören Boya Ustası
Edirne Parça Eşya Taşıma
Altındağ Boya Ustası
Edirne Evden Eve Nakliyat
Bolu Parça Eşya Taşıma
EA30A
ReplyDeleteorder deca durabolin
order pharmacy steroids
Çankırı Evden Eve Nakliyat
Kripto Para Nedir
Aydın Evden Eve Nakliyat
order sarms
buy turinabol
anapolon oxymetholone
order parabolan
FDDA4
ReplyDeletebuy testosterone propionat
Nevşehir Evden Eve Nakliyat
oxandrolone anavar
Tekirdağ Boya Ustası
Muğla Evden Eve Nakliyat
Silivri Çatı Ustası
testosterone enanthate for sale
Bayburt Evden Eve Nakliyat
buy pharmacy steroids
38A49
ReplyDeleteManisa Evden Eve Nakliyat
Gölbaşı Boya Ustası
Area Coin Hangi Borsada
Tunceli Şehirler Arası Nakliyat
Kastamonu Parça Eşya Taşıma
Ünye Oto Lastik
Meta Coin Hangi Borsada
Niğde Lojistik
Hakkari Şehir İçi Nakliyat
D3F44
ReplyDeletebinance
92FF8
ReplyDeletebinance referans kodu %20
95D3A
ReplyDeleteLovely Coin Hangi Borsada
Vector Coin Hangi Borsada
Youtube Abone Hilesi
Görüntülü Sohbet
Görüntülü Sohbet Parasız
Floki Coin Hangi Borsada
Pitbull Coin Hangi Borsada
Mexc Borsası Kimin
Threads Beğeni Hilesi
83297
ReplyDeleteKripto Para Üretme
Ort Coin Hangi Borsada
Star Atlas Coin Hangi Borsada
Pitbull Coin Hangi Borsada
Binance Borsası Güvenilir mi
Keep Coin Hangi Borsada
Tiktok Beğeni Satın Al
Area Coin Hangi Borsada
Binance Madencilik Nasıl Yapılır
93383
ReplyDeleteuniswap
phantom wallet
debank
satoshivm
thorchain
dao maker
sushiswap
trezor suite
pancakeswap
شركة مكافحة الفئران بالاحساء rHRQeCfS2s
ReplyDeleteشركة عزل مواسير المياه بالقطيف NU2jqk8r6z
ReplyDeleteشركة تنظيف خزانات tWYE5IxglA
ReplyDeleteشركة مكافحة حشرات بخميس مشيط 0YwJ4sYEv3
ReplyDeleteD711439A33
ReplyDeletetiktok takipci satin al
75F37A02A1
ReplyDeletedüşmeyen takipçi
Para Kazandıran Oyunlar
Pasha Fencer Hediye Kodu
Google Haritalara Yer Ekleme
Call of Dragons Hediye Kodu
Kafa Topu Elmas Kodu
Pubg New State Promosyon Kodu
Call of Dragons Hediye Kodu
İdle Office Tycoon Hediye Kodu
60013D2E41
ReplyDeleteAnadoluslot Giriş Adresi
Anadoluslot Yeni Adres
Anadoluslot Giriş
Anadoluslot
Trwin
Trwin
Trwin
Trwin Giriş Adresi
Trwin
34F2A2BBCB
ReplyDeleteyeni mmorpg
sms onay
mobil ödeme bozdurma
instagram takipçi satin alma
-