Thursday, April 28, 2011

You may have noticed...

You may have noticed that I have been missing in action. I'll be honest. I was here:

photo courtesy of my dear sister-in-law
Yes my friends...the beaches of San Diego. This weekend I attended a beautiful wedding with a beautiful bride and a pretty good looking groom. Jealous? Don't worry, I would be too. 

Its funny how you need a vacation to recover from vacation. Regardless, I am back and you can expect to hear more from me.

And even though I am fond of you, I never mind a little vacation. Take one....you'll thank me later.
Read More »

Monday, April 18, 2011

˚sewing tip˚ Fabric is SO Expensive!

I love to sew. (Pretty sure you all know that). But fabric can be sooooooo expensive. 

So, I have to find creative ways to decrease the price of some of my projects. I thought I would share two tips to make sewing a little bit cheaper.

1. Did you know that Joann's will accept competitors coupons? Multiple in the same transaction? Whenever  I go I try to bring a Joann's coupon, a Micheal's coupon, and a Hobby Lobby coupon. They will take all three in one transaction. Just make sure the coupons have valid dates. All of the stipulations still apply (exclusions for sale items, etc.) but they will take them. Ah....I love saving money. 

2. Last Christmas, I got a request for a lot of homemade items. As I was browsing the clearance items at Kohl's I ran across this shirt. 

I loved the fabric, but the shirt wasn't my favorite. The price: less than $3. Plus, I had a coupon. The great thing about Kohls is that they let you use coupons on their clearance section.


So I bought two shirts and after some unpicking and resewing, I came up with a cute skirt that my sister loved. Price of the gift: about $5.50.


So when I look at really cheap clothes, I don't only look for items that will fit me, I also look for fabric.

Another example: this shirt was a favorite of my sisters until it didn't fit anymore. 


After a little reworking, I turned it into a scarf. My sisters loved this. The cost: free!


I made another sister (I have four) a hat made from an old sweater and a button I already had. Totally cute and free!


So just remember...sewing doesn't have to be expensive!
Read More »

Wednesday, April 13, 2011

˚budgeting series-part 7˚ Tracking

So you've done all the hard work, and now its time to make everything look pretty.

There are a few methods to tracking your expenses. Some people love a spreadsheet on the computer. You can put formulas in the cells and all the adding will be done for you. 

For us, that doesn't work so well. We never remember to enter our expenses, and our budget became more of a accounting of where our money had been spent, rather than a way to budget our money and make sure we didn't overspend. 

What do we do?
The good, old-fashioned paper on the fridge. That's right. We print out a budget sheet each month and keep it on the fridge. That way it is staring us in the face every time we reach for a glass of milk.

Don't believe me? Come on over and you can look for yourself to see how much money we have left in our food budget for the month. 

So, I thought I would share the method we use to track our expenses. Here is the document we use. You will probably have to adjust it for yourself, but this will give you a good idea of what goes on around this house. 


So let me explain a few things:

1. These are the categories that we have developed (and adjusted) over the years. They work for us and they are always changing. That's a good thing. Once you make a budget, you are going to have to adjust it occasionally. 

2. Under many of the categories, you see this: $ XX + __________= _________. We have the set budget amount ($ XX) for the month. We add (or subtract) the leftover money we had from the previous month to get our new budget amount for the month. Make sense? Let's say my food budget for the month was $300. And last month, we spent $302. I would take $300 - $2 = $298. Make more sense? We do it this way so we can save up in a category if we know we will want more in that category for a certain month (like the gift category in a birthday month). I'll be honest. It doesn't always work out. But it is really fun to try. It is also a big motivator to try and stay in the budget because if you don't there are consequences coming next month.

3. In our church, we pay a tithing and give other donations. We don't include that in our budget (mostly because we don't make enough money right now to include that). So it is pretty much just coming out of savings. 

5. The little box at the bottom of some of the categories is to write how much we underspent (or overspent). If we spent $250 of $300 in our food budget that month, we would write +50 in the box (and that +50 would transfer over to the next month.) If we spent $325 out of $300, we would write -50 in the box (and we would have to subtract $50 from next month's food budget). This helps us be motivated to actually stay in our budget. 

6. We try our best to write down the date, store, (or item) and total we spent every time we spend money. We also add up totals a few times in the month so we can see what we have left to spend in each category. 

PHEW!

And before I go and let you experiment to see what works for you, I will leave you with one more great resource.

Mint.com: This resource is a place for you to be able to see all your accounts. (Saving, IRAs, checking, etc.) You can't transfer any money on this site, but you are able to see everything. It is protected the same as a bank website (and you can learn all about it on their site). You can also budget, set goals, and get recommendations for good financial planning. 

While Mr. Candid and I use Mint.com as an overall reference, we really prefer the paper on the fridge. 

It just works for us.

Now go find what works for you and start tracking your expenses!

*Update: click here to see part 1part 2part 3part 4part 5part 6, and part 8.
Read More »

Tuesday, April 12, 2011

˚tutorial˚ Free Hand Quilting - Stippling

Have you ever made a quilt and had it quilted at a shop. It is so expensive. 
Did you know that instead, you can quilt it yourself? On the sewing machine you already have? 

Wahoo!! (Get prepared for an arm workout...literally.)

So...you have finished the top of your quilt. Now what? 

Well, first I would suggest trying to stipple a smaller project just for practice before doing your quilt. That way you will be much more comfortable when you stipple your pride and joy.

Also, I have to say that this method uses lots of safety pins. I have heard that some people use quilting spray adhesive which works well too. For me, safety pins are cheaper...so I use them. 

Here's what you do:

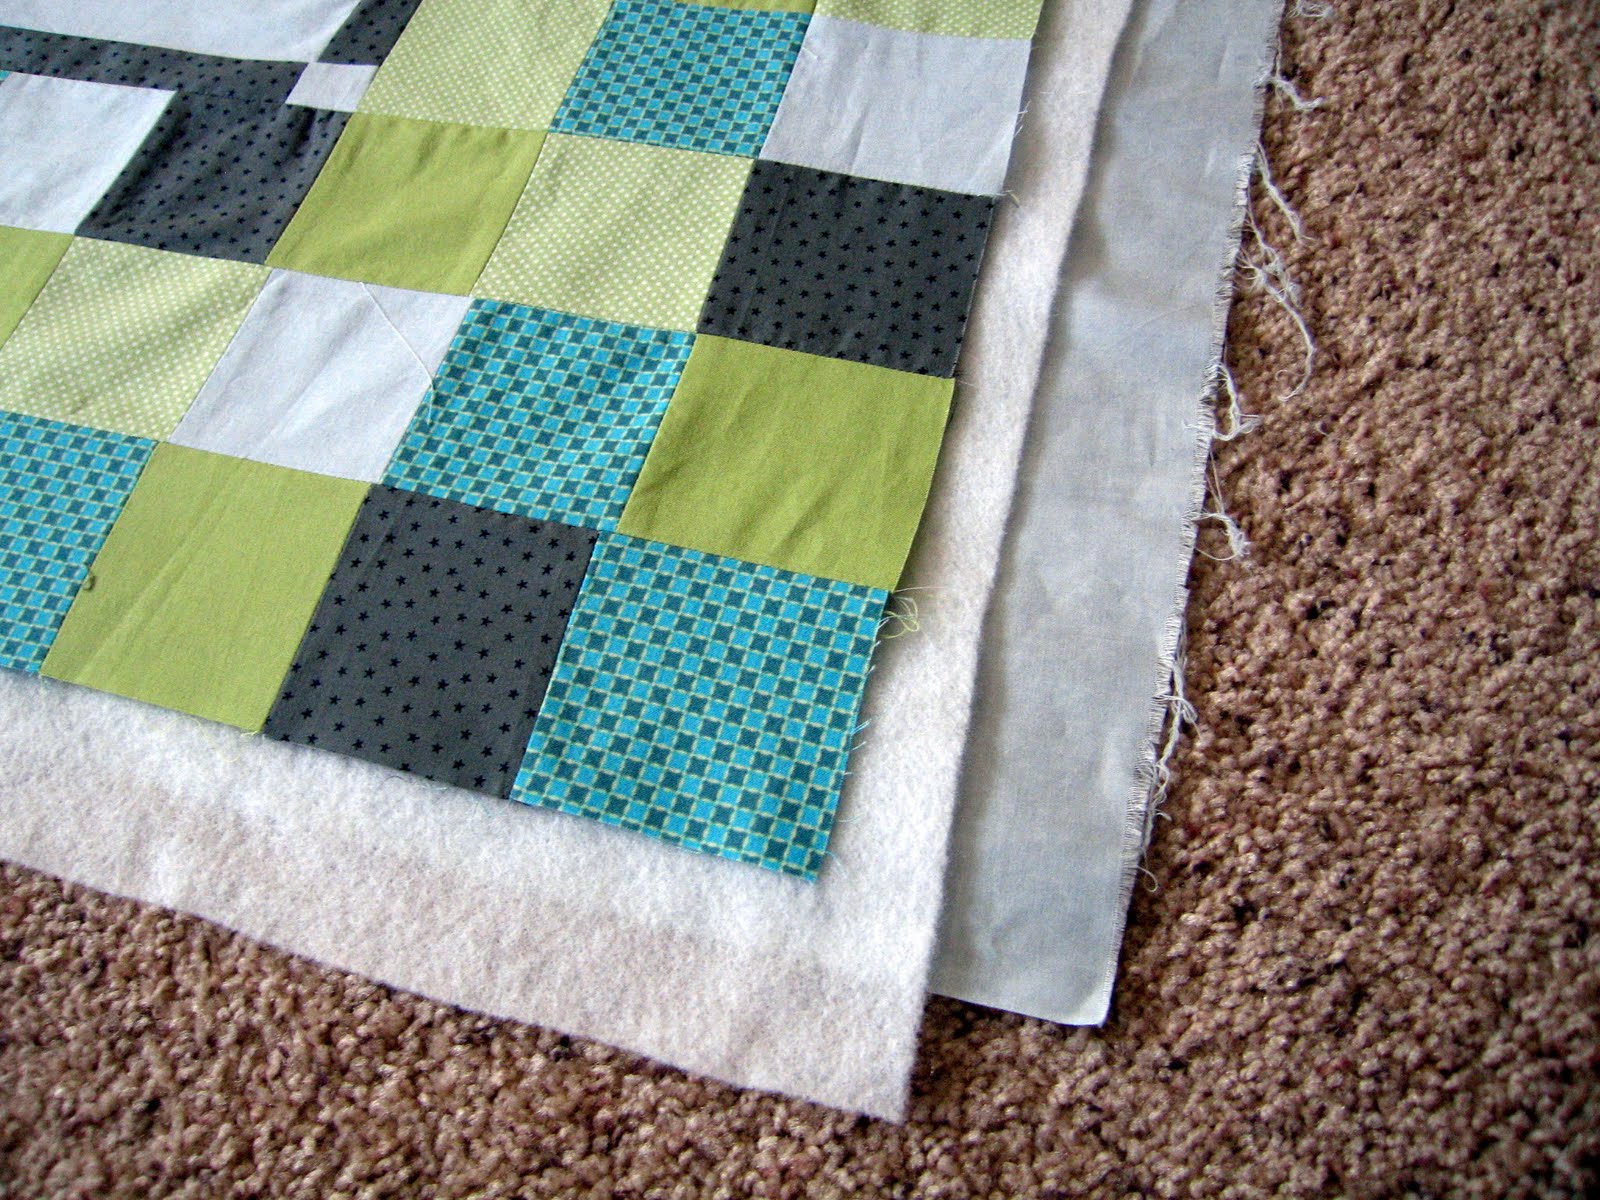
First, find a large open space and lay the backing of your quilt flat. You want the wrong side up. (Which means the right side--or the one you want to see when its finished--would be facing the floor.)


Next, lay your batting on top of the backing. Flatten it out as best as you can. 


Next, lay the top of your quilt on the batting with the right/pretty side facing up. As you can see, we are building the quilt the way we will want it to look when we are done. 


Double check that your backing and batting are sticking out farther than the top of your quilt. If not, try again. This is really important!


Once you have adjusted your layers and everything is laying as flat a possible, grab a whole bunch of safety pins. You will want to pin about every 4-6 inches depending on what you are comfortable. When pinning, make sure you catch all three layers (and not the carpet). Smooth and straighten the layers as much as you need to get everything as flat as possible. Start in the middle...


...and work your way out, tugging softly on each layer to make sure it is flat. 


And keep pinning....and pinning.....and pinning until your blanket looks something like this:


This is a good time to double check that the bottom layer and the batting are bigger than (and reaching over the edge) of the top. 

When you flip it over, I guarantee that the bottom will not look as straight and flat as the top. That's okay. Just do your very best to make sure the layers are as flat as possible. 


In order to stipple with free hand quilting, you need a free hand quilting foot. Mine looks like this: 


You also need to drop the feed dogs (the little teeth-like bar underneath your sewing foot that grabs the fabric and pulls it through while you sew).


You may have to look in your sewing machine manual to figure out how to drop the feed dogs. On my machine, I just push a button. Some machines don't have a way to drop the feed dogs, but they have a metal plate that you attach so that the feed dogs aren't touching the fabric. Either way, when they are dropped, they will look something like this:


If you have a little sewing table that attaches to your machine and gives you more surface area to work on, you will definitely want to use it. It really helps,

You want to take your quilt and roll it up until you get to the center. You will start quilting in the center and work outwards. You never want to have more than 1/2 of the quilt rolled up (it gets a little squishy as you can imagine). Put the rolled portion in your machine like this:


Now, drop your sewing foot like this:


At the beginning of the stitch, instead of back stitching, just stitch a few stitches in the same place before moving your fabric. This will secure it. Start making loopy patterns around your quilt. You will want to double check that the fabric underneath is laying nice and flat. Don't stitch over any safety pins, just stipple your way around them.

The trick to stippling is to try and keep the speed of the stitch the same, and the speed of your hands moving the quilt around the same so that the stitch length on the quilt is fairly constant (this is really hard....so don't get discouraged if you have some long stitch lengths and some that are short). 


When you need to readjust the fabric (which is pretty often), drop your needle into the fabric so it holds while you are moving things around. Again, make sure that bottom layer is nice and flat. 


As you go, you will have two hands (one of mine had to take the picture) on the side of the quilting foot moving the fabric around as you go. This is where the arm workout comes in. Seriously.


And as you go, this is what your quilt will start to look like. 


If you ever come across a long piece of thread coming out of the machine without catching, it means that your bobbin is empty. Put more thread on it, and start again. Just start a little bit (1/4 inch) before the thread stopped and stitch a few stitches in one place to secure it. And keep on stippling....


When you are finished, you should have stippled every last part of your quilt. Good job! (I hope your arms aren't killing you).


Go through and trim up all the loose threads.


Then remove all the safety pins. 


And don't be surprised if you find a few places where the bottom wasn't laying quite flat. Once you wash and use the blanket, they aren't as noticeable. Trust me!


It looks pretty crazy from the back!


You will want to trim off the extra backing and batting to create a nice flush edge with the top of your quilt. 


And you did it! 


Now all you have to do is add the binding. (Tutorial on that to come soon.)

Happy Stippling!
(If you have questions, please email me or leave them in the comments and I will be sure to answer them as soon as I can.)
Read More »

Friday, April 8, 2011

˚recipe˚ Laundry Detergent

That's right folks. This is a recipe for laundry detergent. 


And oh how I love this detergent. Around here, we have had a un-fixable problem with static. We've tried everything. Maybe one day I will post on all the ways to lessen static on your clothes. Most of those tricks helped, but now we have found the ultimate answer

Not only does this detergent seem to get rid of static for us, it also smells so good, makes our clothes super soft, and is really cheap to make. (love that!)

Not really into making your own laundry detergent? I totally understand. You might purchase the ingredients and put them (with the recipe) in your emergency storage just in case! Nothing like having plenty of detergent when no one else does.

This recipe makes about 12 gallons of laundry detergent, so be prepared to store that much in milk cartons or other containers, unless you make 1/2 a batch (which is what I did. FYI: the pictures show 1/2 the recipe).

Things you need:

5 gallon bucket
Cheese grader
1 bar of Fels-Naptha soap grated (found in some grocery stores on the laundry isle, ace hardware, or online)
1 cup Borax (found on the laundry isle)
1 cup Washing Soda (found on the laundry isle)

What to do:

1. Grate Fels-Naptha bar, add to 4 cups of water and melt on medium heat until
dissolved stirring constantly.


2. Fill bucket 1/2 full of hot tap water


3. Add Fels-Naptha solution. Add both the washing soda and borax. Stir until completely dissolved.


5. Add hot tap water until bucket is full. 
6. Allow to cool overnight.
7. Add 50% more water and pour into containers. (I use milk cartons half water/solution.) You may also need to stir up the solution to break it up a little if it has turned jello-like. I have heard that the consistency of this detergent changes each time it is made, but it works well regardless. 


 To use: Pour a full cup into each load of laundry and you will get lovely smelling, sparkly
clean clothes (and static free) for cheap.
Read More »

Wednesday, April 6, 2011

˚budgeting series-part 6˚ Spending Less Than You Make

If you are looking for the FULL budgeting series, click here.

How did assigning dollar amounts go last week in this post?

Now that you have an income total and a list of categories with the dollar amounts you spend in each one, we are going to find out if you will spend less than you make. If not, we will just make a few adjustments

First, add up the total dollar amount you will spend according to your budget. Now, compare that number to the total income you make. Find out what the difference is. Hopefully, you make more than you spend. If not, go back to each category and adjust the numbers (you might have to do a little sacrificing here) to make your income equal or greater than the amount you spend. 

Clear as mud?
Next week we will make our budget look pretty, and start tracking our expenses. See you then!

*Update: click here to see part 1part 2part 3part 4part 5part 7, and part 8.
Read More »

Monday, April 4, 2011

˚cleaning tip˚ Clogged Drains

I really hate clogged drains. They are annoying and the thought of junk trapped in the drain kind of grosses me out. But this stuff is pretty toxic and expensive:
source
 (Not to mention the fact that you have to use almost the whole bottle for one fix.) 

Lame!

I thought I would share a cheap, non-toxic way to unclog drains. FYI: This does not work on really really clogged drains,but it works great for slow draining drains, and as a occasional remedy to prevent clogged drains. (Just do it every time you clean your bathroom and you will never have to use a plunger in the sink. Gross!)
source
Thats right folks. Vinegar and baking soda. just pour about 1/4 c. baking soda down the clogged drain and add about 1/4 c. vinegar and watch it bubble. You might have to do it twice, but even still, this remedy is cheaper and less toxic. 

And, there are about a million other things that vinegar and baking soda do well, but more on that to come later!

Happy Unclogging!
Read More »

Friday, April 1, 2011

˚excuses˚ The Finished Project

Do you remember when I made this excuse? Well, I finally have a finished project, and a sad story to tell you. 
Recently, I have had two close friends that have given birth to stillborns around 20 weeks along. Makes me get a little teary eyed just telling you about it. Since I now live in Texas, and they don't, it is a little hard to know what to do to help them through such a hard time. So, I created quilts for each of my friends.

The first friend named her baby girl Willow. This is the quilt I made for her:


The second is for a little boy. They put "our little trail blazer" on his head stone. I thought a trail with trees was appropriate.


And that is my excuse for MIA. Hopefully these little gifts will help heal their broken hearts.
Read More »
Related Posts Plugin for WordPress, Blogger...